Updated:
17 September 2024
See also:
Purpose
The OffHours add-in ensures that emails you write after business hours or on weekends are held and sent only at the start of the next business day.
You can set your business hours by modifying the recurring appointment "AllowedToSend", which defines when emails are sent immediately and when they are delayed.
This appointment must be created in the calendar folder named "AllowedToSend".

Current version: 1.0.1
Installation
- Read the End User License Agreement. Proceed with the following steps only if you agree to the EULA.
- Log in to new Outlook for Windows or to Outlook on the web. Click "Add Calendar". Select "Create blank calendar" and create the "AllowedToSend" calendar as shown below.

- Navigate to the "AllowedToSend" folder. Click "New event" and create a recurring appointment named "AllowedToSend" according to your needs.

- Select the "Mail" tab, then select "Get add-ins".
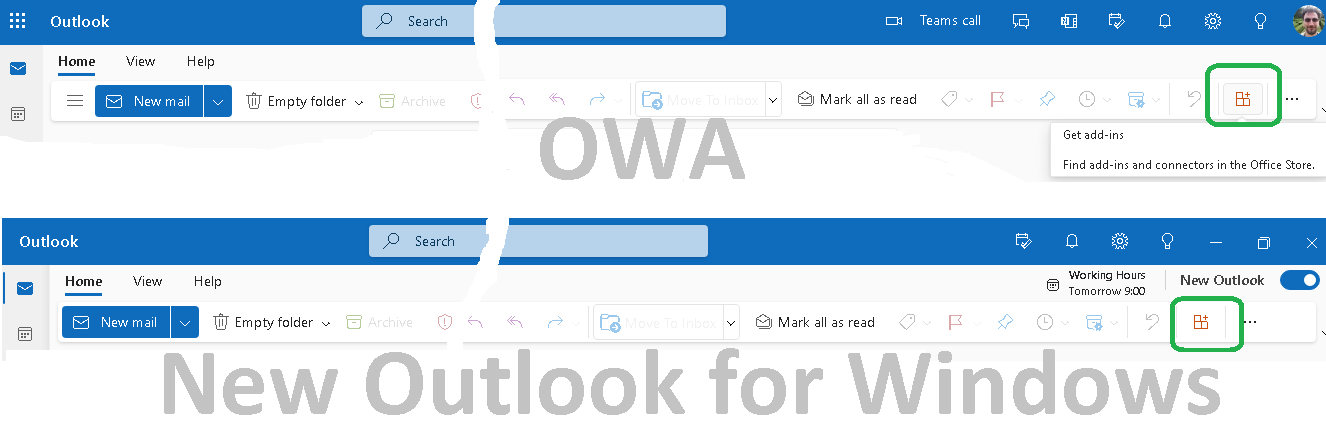
- Select "My Add-ins". Scroll down and click "Add a custom add-in".

- Verify that OffHours is in the list.

From the drop-down list, select "Add from URL...". Enter https://www.ivasoft.com/OffHoursOWA/offhoursowa.xml in the "Enter the URL of the add-in's manifest file:" field. Click OK [1]. A warning message will appear — click Install [2].

Testing
- At any time during non-business hours, open Outlook and send a message. Verify that the message is not sent but held in the Drafts folder.

- Open the message and verify that it is scheduled to send later according to your "AllowedToSend" calendar. To send the message immediately instead, click the "Cancel Send" link.

- At any time during business hours, open Outlook and send a message. Verify that the message is sent immediately and placed in the "Sent Items" folder.
Uninstallation
- Log in to new Outlook for Windows or to Outlook on the web.
- Select the
 "Get Add-ins" icon. Select "My Add-ins".
 - Scroll down to "Custom Add-ins" and click the three-dot icon near OffHours add-in [1] and select Remove [2].

This add-in has been tested with:
- New Outlook for Windows
- Chrome, Firefox, Edge, and IE 11 web browsers on Windows
- Chrome and Firefox on Mac
- Chrome and Firefox on Android
- Firefox on iOS for iPhone
This add-in does not work with:
- Classic Outlook for Windows. (There is the OffHours COM add-in for classic Outlook)
- Outlook for Mac
- Outlook for Android
- Outlook for iPhone
- IE 10 Mobile on Windows Phone 8.1
Demo Version Notes
The demo version appends [OffHours DEMO] to the subject line of each delayed message; the full version does not.
Privacy Policy
The OffHours add-in does not collect or transmit any user information.
Pricing and Licensing
This product is licensed per user.
Payments are processed by PayPro Global. For payment-related support, contact PayPro Global Customer Support.
Payments are processed by PayPro Global. For payment-related support, contact PayPro Global Customer Support.

A Site license covers a single organization at one physical location, with an unlimited number of installations.
An Enterprise license covers all computers across a single organization worldwide, including all branches and remote users.
An Enterprise license covers all computers across a single organization worldwide, including all branches and remote users.