SmartReply is a utility for Exchange Server/Office 365 users who need to send mail from different addresses.
This utility allows an Outlook user the ability to easily select the From address of the new, replied or forwarded message.
The message can be replied with the same From address as original message has been sent to.
Also you can set a different signature for each e-mail address.
Current version: 1.0.13
SmartReply can be used solely or in cooperation with ChooseFrom for Exchange or ChooseFrom 365 service.
Being used solely, SmartReply can only change the Reply-To: address but not the From: address.
In cooperation with ChooseFrom it can change the From: address.
The utility is an Outlook COM add-in.
Typical scenarios of usage
- Scenario 1.
Your company has several company names that it goes under for various aspects of the business. As a result of that, you are running into the need to be able to choose which email address to send from. As the company runs Exchange, IvaSoft ChooseFrom utility has been bought and installed on the server. So far so good, but users complain about the need to fill out the "Have replies sent to:" field every time they need to send as non-default address.
SmartReply simplifies the process of selection the From address.
- Scenario 2.
You are in an Exchange Server environment and have permission to send on behalf of/send as another user. You can enable the From: field from the view menu of your Outlook and select the appropriate name/address to e-mail from. However you can't assign different signatures to different e-mail addresses then.
SmartReply can help you to solve this problem. You do not need to install any server-side software like ChooseFrom to implement this functionality.
- Scenario 3.
A quote from reddit.com:
Hi guys, have set up a few email addresses as aliases on a second domain for a customer (each domain dealing with a different aspect of the business).
The issue is that emails sent to aliases always land in the same inbox - is there a way to have some kind of flag so the customer knows which address it has been sent to so they can reply from the correct email address and with their correct signature?
SmartReply tool will help you to identify the address easily - just add the "E-mail account" column in Outlook as shown here.
Installation
- (Optional) On your Exchange server install ChooseFrom application and test it.
- Download
SmartReply-Demo.zip archive file to any folder on your workstation. Run SmartReplySetup(DEMO).exe and follow the instructions.
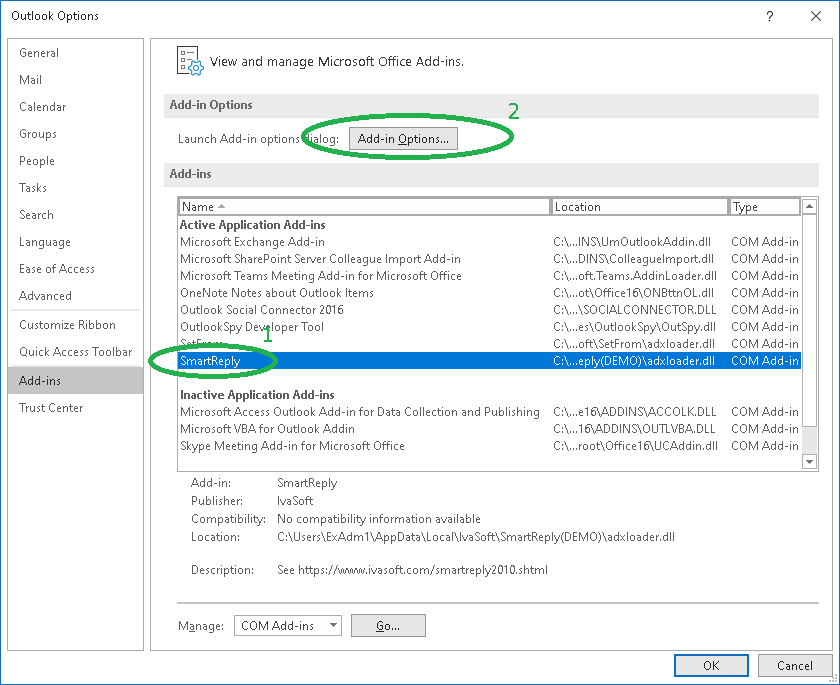
- Run Outlook. Select File > Options > Add-ins and make sure that SmartReply exists in "Active Application Add-ins" list (1). Now click "Add-in Options" button (2). Add-in Options window will appear.
- Select SmartReply tab. You will see your default identity that has your default (primary) SMTP address in Identities list.
Click "Active Directory Addresses" button [1]. Identities list will be populated with identities that matches your non-default SMTP addresses.
Click "Additional Mailboxes" button[2]. Identities list will be populated with addresses of your additional mailboxes.
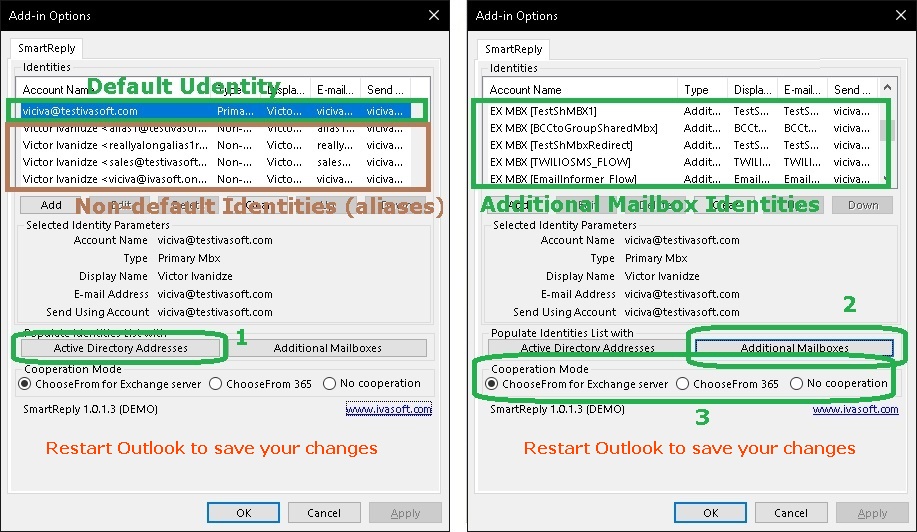
If you run ChooseFrom utility with on-premise Exchange server, select "ChooseFrom for Exchange server" radio button in "Cooperation Mode" frame [3].
If you are a user of ChooseFrom 365 cloud service, select "ChooseFrom 365" radio button.
If you are using SmartReply solely select "No cooperation" radio button.
Now click "OK" to close the property page. Exit Outlook and start it again. Make sure that Identities list is still populated.
- [Skip this step if you run SmartReply ver 1.0.0.8 or newer.]
Select File > Options > Advanced (1). Click Send/Receive... button (2). Select All Accounts in the list (3). Click Edit button (4). Select each account that has been created by SmartReply (5) and uncheck "Include the selected account in this group" checkbox (6). If you are not sure which account to disable, click "account Properties..." button (7). All accounts created by SmartReply have "none" in "Incoming Mail Server" and "Outgoing Mail Server" fields (8).
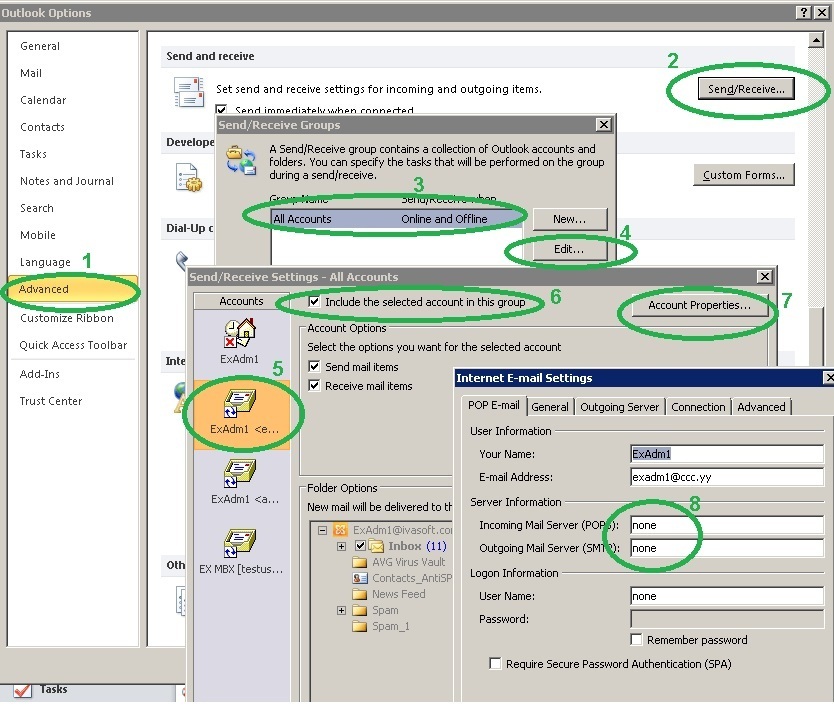
Click OK button to close "Send/Receive Settings" window. Click Close button to close "Send/Receive Groups" window. Click OK button to close "Outlook Options" window.
- Navigate to Inbox folder. Click View (1) > "View Settings" (2). Click Fields... button (3). Select "All mail fields" (4) from the list on top left corner of the form. Select "To" and "E-mail Account" fields in "Available columns:" list and press Add button. Make sure these fields are in the right list now (5)."
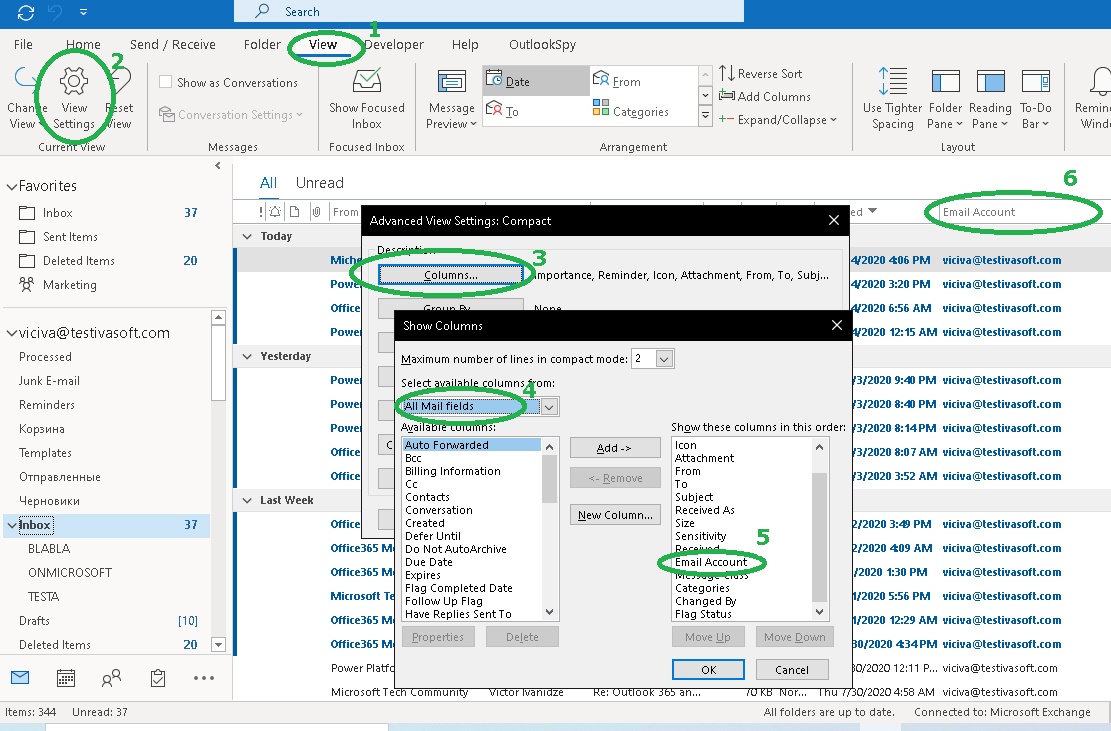
Click OK button to close Show Columns window. Click OK button to close "Advanced View Settings" window. Now you see "To" and "E-mail Account" columns in the view (6).
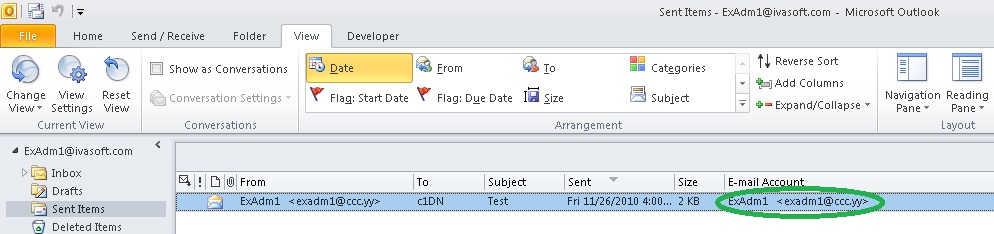
Navigate to Sent Items folder and perform the same procedure.
Testing
- Open Outlook and create a new message. Click From button and select a non-default account (identity) from the list. Place any address you can control in To: field. Fill out Subject and message body. Send the message.

- Navigate to Sent Items folder and find a message you just sent. Look at "E-mail account" column.
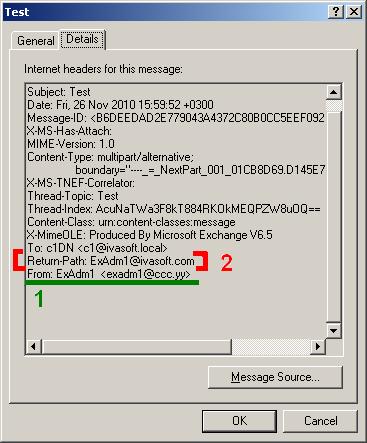
- (We assuming that ChooseFrom utility is running properly on your Exchange server.) On the receiving side open the message you just sent and check it's Internet headers.
The screenshot shows how the received message Internet headers look in Outlook Express program.
Make sure the From field contains the same identity that you have used initially (1).
Note that ChooseFrom does not change the "Return-Path: header (2).
Reply to the message.
-
In Outlook navigate to Inbox folder and find a message you just sent. Look at "To:" (1) and "E-mail account" (2) columns.
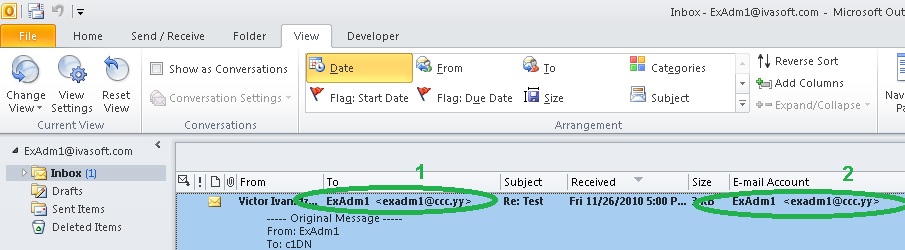
Click Reply button. A new message will appear. Note that the proper From: value is pre-selected (1).

SmartReply has been tested with Outlook 2013/2016/2019/2021 32-bit and 64-bit versions.
Uninstallation
- Run Outlook and select File > Options > Add-ins. Click "Add-in Options" button. Select SmartReply tab.
- Click "Clear" button to clear the list of identities. You will see the following warning: "Are you sure you want to delete all custom identities?". Click Yes. Click "OK" button to close the property page.
- Restart Outlook and make sure that Identities list contains only primary (and secondary, if any) mailboxes. Exit Outlook.
- Select Start > Control Panel. Select Programs and features. Select SmartReply in the list. Right-click and select Uninstall. Follow the instructions.
About this demo version
This demo version of SmartReply utility is fully functional, but will show a splash screen when it loads.
F.A.Q.
Q. I get error messages when receiving mail. All of the alternate addresses show a message saying "Receiving reported an error, 0x08840900: The server name you entered cannot be found on the network (it might be down temporarily). Please verify that you are online and the server name is correct". I actually get mail, but these messages will be disturbing to other users. What's the matter?
A. You should perform step #6 of Installation section to exclude the fake accounts from Send/Receive group.
Q. I am about to purchase this product but I wondering regarding updates/patches. What are the policies regarding updates? Do you provide them freely or as a purchase?
A. As a registered user, you will get free updates for one year from the date of purchase.
Once the new version is ready, this information will be e-mailed to all registered users. We will send updates via e-mail to those who request them.
Q.
I have already ordered your software and want to view data relating to my order.
A.
Just visit our Customer Care Center.
Prices
Licensing policy: the product is licensed on a per-computer (sometimes called per-workstation) basis.
If you are running Outlook on Windows Terminal Services or Citrix, you should purchase 10 licenses for each Citrix/TS server or a Site license.
All transactions are securely processed by our external registration providers.
License type
Price per unit
Single license (1-4)
$50.00
Single license (5-9)
$45.00
Single license (from 10)
$42.00
Enterprise license (including the source code)
$7000.00
Site license covers a single organization in one location (building complex). If you purchase a site license, you may use the program in an unlimited number of your company's computers within this area.
Enterprise license covers all computers of single organization world-wide. If your company has many branches even with thousands of machines, Enterprise license covers them all.
If you are running Outlook on Windows Terminal Services or Citrix, you should purchase 10 licenses for each Citrix/TS server or a Site license.
Want to get some extra profits aside to your own business? Promote software on your website through an advanced affiliate network.
What does it mean exactly?
Get % commission for every referred sale on your website. Simply become a IvaSoft affiliate now!
How do I start off?
- Register as a IvaSoft affiliate in PayPro Global Affiliate System using this link
- Review IvaSoft affiliate campaign details (enrolled products and markets).
- Get approved by the IvaSoft (Affiliation agreement activation).
- Download all the product media found in your Affiliation Agreement together with the redirect link for potential customers.
- Place a display ad (banner) or a contextual promo on your website or blog.
- Get monthly payouts according to your affiliation agreement.
And you are good to go! PayPro Global takes care of the rest!
What are the benefits?
- Easy implementation of the system.
- Order processing, fraud management and customer support is handled for you.
- Monitor and analyse your referral sales in reports.
- Receive scheduled payouts by any suitable method.
