SelectiveSenderName for Microsoft Exchange 2007/2010
| Customer Care Center | ||
Updated: 7-June-2010 |
See also: |
SelectiveSenderName for Microsoft Exchange 2013 |
Current version: 1.0.0.1 |
Purpose
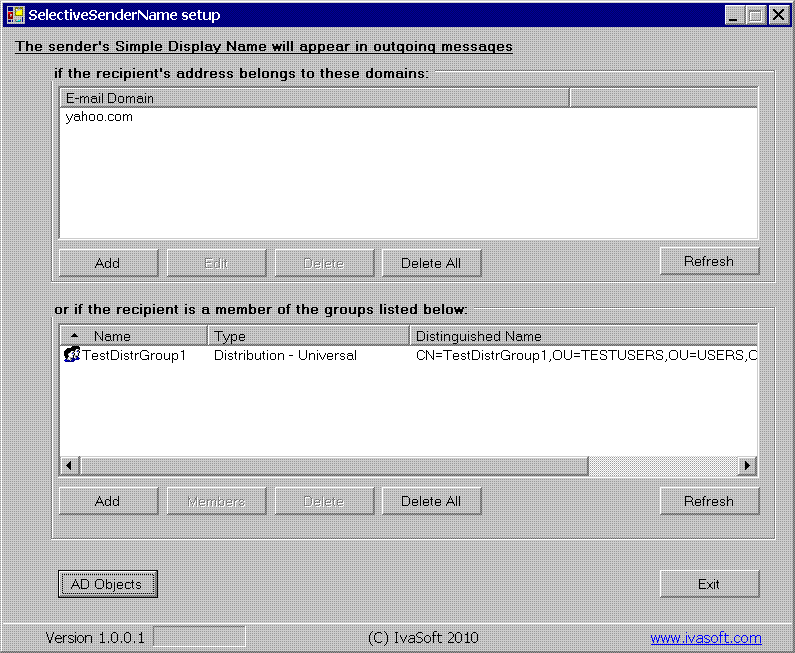
SelectiveSenderName application allows you to set "Simple Display Name" attribute as a display name of the sender based on recipient's e-mail domain or on recipient's group membership. The application includes a program to define e-mail domains and groups that will be affected. It also provide an easy way to modify Simple Display Name value of any mail-enabled Active Directory object. As a result, you have a regular Exchange display name like usual but then have a different external one which everbody who you send emails to sees.
This application provides an ability to use different sender display names for internal and external e-mails.
Microsoft is supporting this feature in Exchange 2003 and in Exchange 2007 but not in Exchange 2010.
The application is a transport agent for Exchange server.
Installation
On your Exchange 2007/2010 Hub Transport Server or Edge server computer:
Testing

We have tested SelectiveSenderName on Exchange 2007 64 bit SP2 with Update Rollup 3 (a single server that plays Hub Transport, Client Access and Mailbox roles) on Windows Server 2003 R2 Enterprise x64 Edition SP2.
The program also has been tested on Exchange 2010 on Windows Server 2008 Standard x64 Edition.
Limitations
SelectiveSenderName 2007 utility version 1.0.0.1 can work on Exchange 2007 SP 1 with Update Rollup 4 or a later service pack/update rollup installed.
Uninstallation
1. Run a command prompt. If you are running Exchange 2007, navigate to C:\Program Files\SelectiveSenderName2007\Ex2007 directory.
If you are running Exchange 2010, navigate to C:\Program Files\SelectiveSenderName2007\Ex2010 directory.
2. From the command prompt run uninstall.bat
3. Delete C:\Program Files\SelectiveSenderName2007\ directory.
About this demo version.
SelectiveSenderName demo version adds "[SelectiveSenderName 2007 DEMO]" to the Subject line of each message processed.
F.A.Q.
Q. I am installing this product on a 64bit machine. I followed the directions and tried them from the "Program Files" folder. I got the following error:
"install.ps1 is not digitally signed".
A. Set WSH to unrestricted mode as described here.
Q: Are updates free?
A: Registered users receive free updates for one year post-purchase.
Licensing policy: the product is licensed on a per-Exchange server basis.
| Number of licenses | Individual price |
|
||||
| 1-2 | USD 99 |  ORDER | ORDER | |||
| From 3 | USD 77 | |||||
| Site license | USD 2999 | ORDER | ORDER | |||
| Enterprise license (including the source code) | USD 13999 | ORDER | ORDER | |||
| All transactions are securely processed by our external registration providers. | Customer Care Center | |||||
Site license covers a single organization in one location (building complex). If you purchase a site license, you may use the program in an unlimited number of your company's computers within this area.
Enterprise license covers all computers of single organization world-wide. If your company has many branches even with thousands of machines, Enterprise license covers them all.